
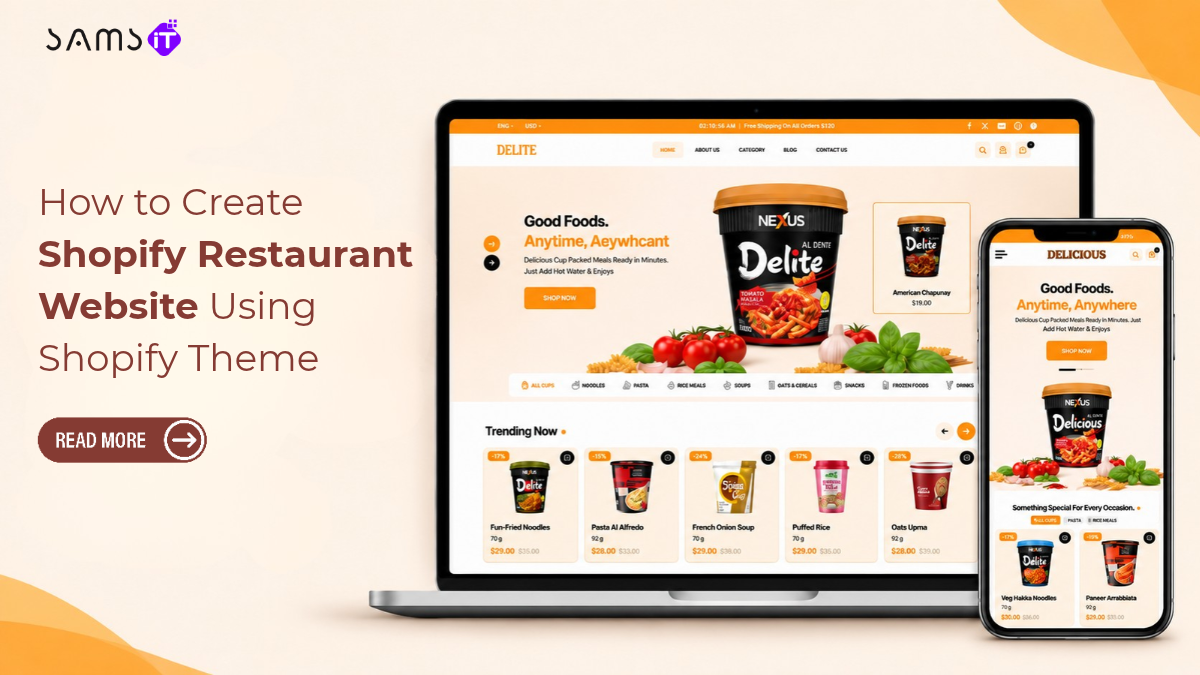
Running a restaurant involves more than preparing good food and serving customers. People also want to check your menu, explore food options, view prices, find restaurant locations, and understand available ordering options before visiting. A well-designed website gives them access to this information and helps your restaurant build an online presence. Shopify provides a platform for creating a restaurant website where you can display menu items, sell food products, promote special offers, and manage online orders. With Premium Shopify themes designed for food businesses, you can customize your storefront to reflect your restaurant’s identity without building every page from scratch.
In this guide, we’ll explain how to create a Shopify restaurant website using a dedicated food theme. From setting up your Shopify account and installing the theme to customizing its settings, adding menu items, and configuring ordering options, you’ll learn the essential steps to launch your restaurant online.
Why Should You Create a Restaurant Website Using Shopify?
A restaurant website acts as an online destination where potential customers can learn about your business and access important information. Instead of relying entirely on social media profiles or third-party food platforms, you can create a website that represents your restaurant and gives customers a direct way to interact with your brand. Here are some reasons to consider Shopify for your restaurant website:
- Display your restaurant menu: Organize food items into categories and provide descriptions, prices, and images to help customers understand your offerings.
- Accept online orders: Sell eligible food products through Shopify checkout and configure suitable pickup or local delivery options.
- Promote special offers: Highlight seasonal menus, meal combinations, discounts, and limited-time food collections.
- Build your restaurant identity: Customize your logo, colors, typography, banners, and website content to match your restaurant’s branding.
- Manage products and orders: Use the Shopify admin to maintain product information, review incoming orders, and manage your online store.
- Connect with customers: Add contact information, social media links, business hours, and other details that make your restaurant easier to reach.
What Do You Need Before Creating a Shopify Restaurant Website?
Before starting the website setup, prepare the basic information and resources required to build your storefront. Having these materials ready makes the customization process easier and helps maintain consistency across different pages. Here are the important things to prepare:
- Restaurant name and logo: Choose a recognizable business name and prepare a logo that represents your restaurant.
- Food menu: Collect your complete menu, including food names, descriptions, prices, categories, and available variations.
- Food photography: Prepare high-quality images of your popular dishes, beverages, desserts, and restaurant interiors.
- Brand colors and fonts: Decide on a consistent color palette and typography that reflects your restaurant’s atmosphere.
- Business information: Keep your restaurant address, phone number, email address, and opening hours ready.
- Delivery and pickup details: Decide whether customers can collect orders, receive local deliveries, or use other available fulfillment options.
- Domain name: Choose a domain that is easy to remember and closely connected to your restaurant name.
How to Create a Shopify Restaurant Website Using a Food Shopify Theme?
The design of your Shopify restaurant website influences how customers interact with your menu and understand your food offerings. Choosing suitable food website templates gives you a starting point for creating a storefront with relevant product and promotional sections. For this setup, we’ll use the Delicious Food Shopify Theme.
Delicious is a food-focused preset of the Nexus Shopify theme. It provides a design direction suited to restaurants, bakeries, cafes, specialty food businesses, and other food brands. You can explore other Shopify food store designs to understand how different layouts present food products and menu collections. You can also customize the available theme sections and settings to match your restaurant’s branding, menu, and business requirements.
Let’s go through the complete setup process.
Step 1: Create Your Shopify Account
Before installing a theme, you need an active Shopify account. Shopify provides an admin dashboard where you can manage your website, products, orders, payments, and storefront settings. Follow these steps:
- Visit the official Shopify website.
- Click the option to start your Shopify store.
- Enter your email address and create your account.
- Complete the initial store setup questions.
- Enter your restaurant or business name.
- Open your Shopify admin dashboard.
Step 2: Add the Delicious Food Shopify Theme
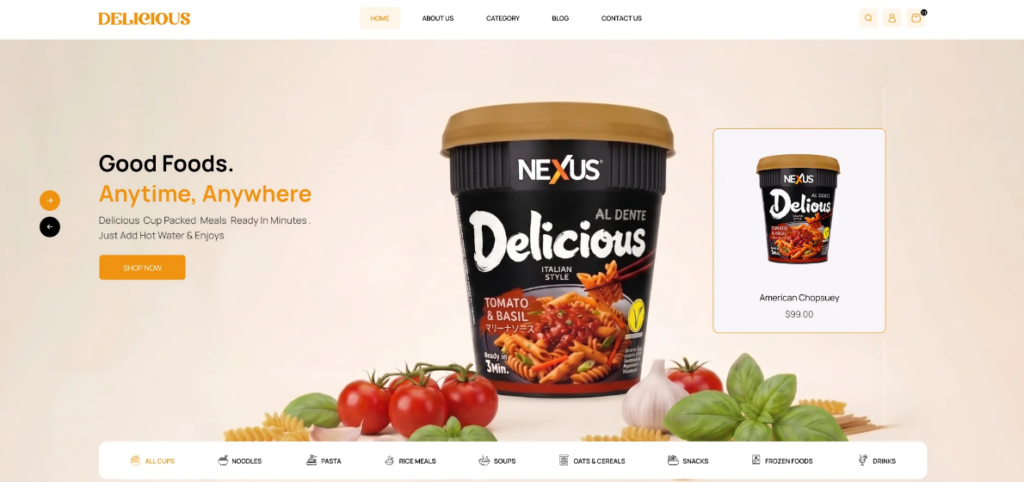
After creating your Shopify account, the next step is to add a suitable theme to your store. The Delicious preset is available through the Nexus Shopify theme. You can review the theme and its available designs before choosing it for your restaurant website. Follow these steps:
- Visit the Delicious Food Shopify Theme page.
- Review the available theme information and preview.
- Choose the option to access or purchase the theme.
- Follow the theme provider’s installation instructions.
- Log in to your Shopify admin dashboard.
- Navigate to Online Store > Themes.
- Locate the installed theme in your theme library.
- Click Customize to open the theme editor. If you need more guidance, read our guide on how to customize a Shopify theme.
- Select the Delicious preset or its corresponding design where the theme provides preset selection.
Step 3: Customize the Restaurant Website Through Theme Settings
Once the theme is installed, you can customize its appearance through Shopify’s theme editor. This is where you can adjust the visual elements that appear throughout your storefront. To access the settings:
- Open your Shopify admin.
- Navigate to Online Store > Themes.
- Locate the Nexus theme with the Delicious design.
- Click Customize.
- Open the Theme settings panel in the editor.
- Review the available customization options.
- Adjust the settings according to your restaurant’s branding.
- Click Save after completing the changes.
A. Customize Your Restaurant Logo
Your logo helps customers recognize your restaurant and creates a consistent identity across the website. To customize it:
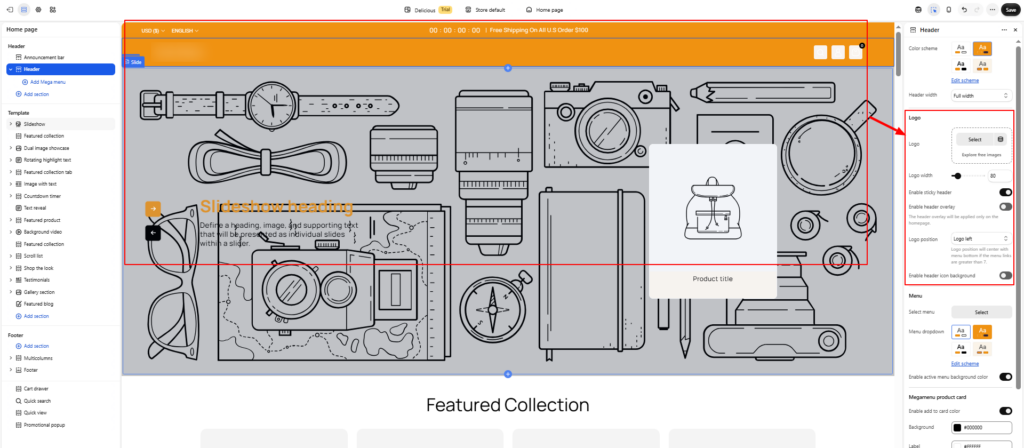
- Open the theme editor.
- Navigate to the Header section or the relevant logo setting.
- Upload your restaurant logo.
- Adjust the logo width if the setting is available.
- Select the appropriate desktop and mobile logo options, if supported.
- Preview the header.
- Save your changes.
B. Change Website Colors
Your website colors should reflect the restaurant’s branding and create a consistent visual experience. For example, a bakery might use warm colors, while a premium dining restaurant may prefer a darker and more refined color palette. If you operate a bakery, you can also explore the best Shopify bakery themes for suitable storefront design ideas. To update your colors:
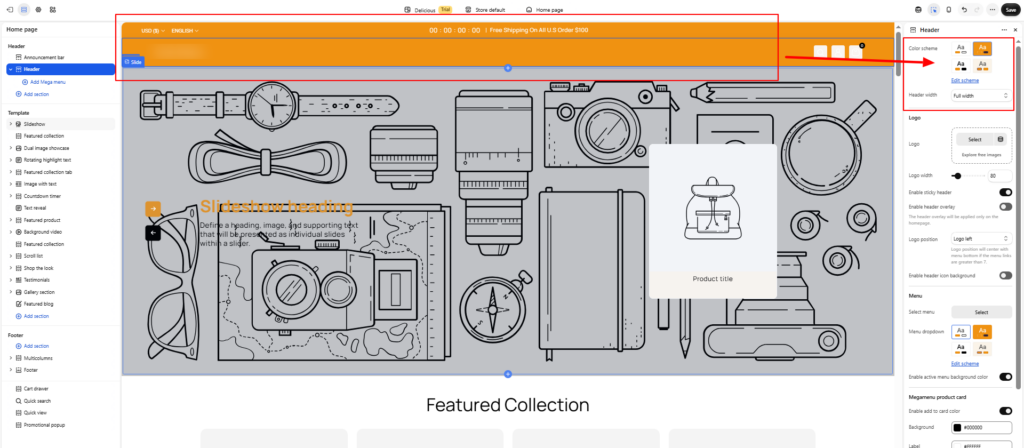
- Open Theme settings.
- Select the Colors or color scheme option.
- Review the available color settings.
- Update the background, text, accent, and button colors.
- Apply the changes to the relevant color schemes.
- Preview the storefront.
- Click Save.
C. Customize Website Typography
Typography affects the readability and overall appearance of your restaurant website. Follow these steps:
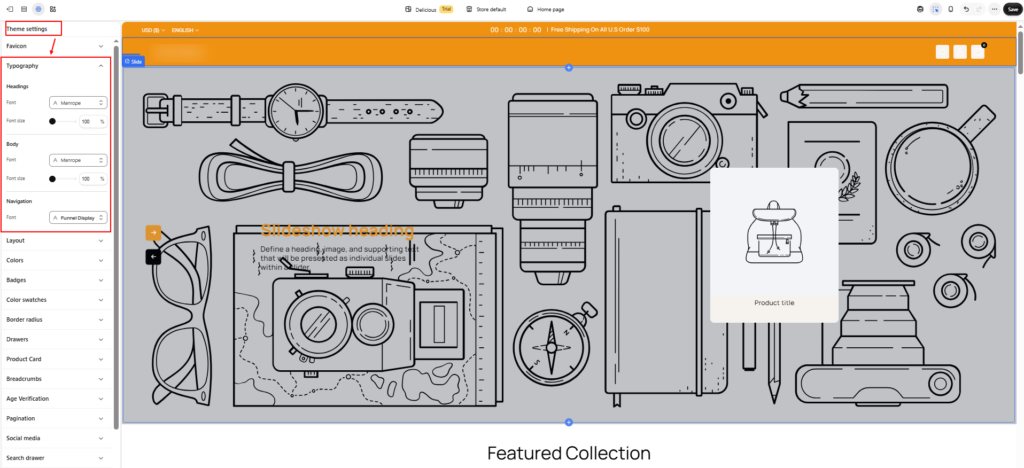
- Open Theme settings.
- Select Typography.
- Review the available heading and body font options.
- Choose fonts that complement your restaurant’s branding.
- Adjust the available font sizes and weights.
- Preview the headings and descriptions.
- Save your settings.
D. Customize Website Buttons
Buttons guide visitors toward important actions, such as viewing the menu, exploring food products, or placing an order. To customize them:
- Open Theme settings.
- Find the button or relevant design settings.
- Review the available button styles.
- Adjust the background and text colors where supported.
- Configure the available border and shape options.
- Save your changes.
E. Customize Social Media Settings
Social media links help customers connect with your restaurant outside your website. To configure them:
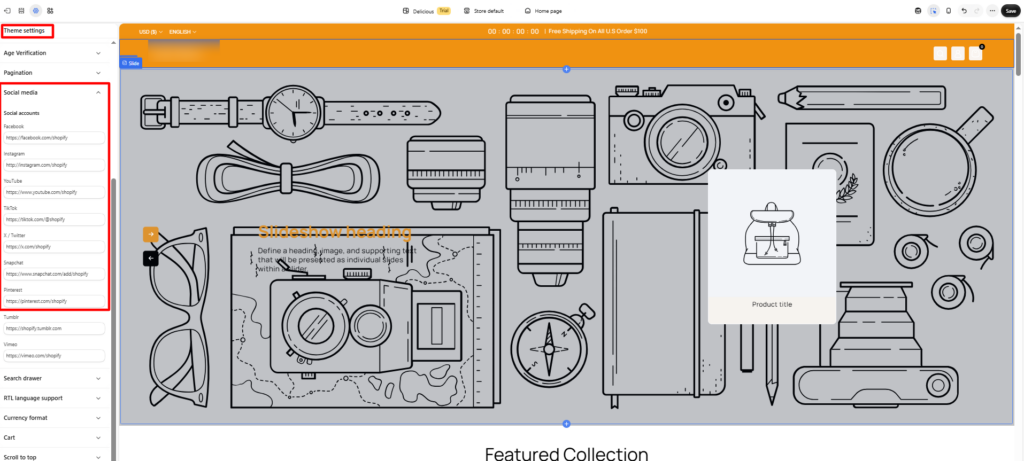
- Open Theme settings.
- Find the Social Media section.
- Enter the URLs of your restaurant’s social media profiles.
- Review the available social media icon settings.
- Save your changes.
Step 4: Customize the Restaurant Homepage
Your homepage introduces visitors to your restaurant and guides them toward important sections of the website. The Delicious design can be used as a foundation for arranging food-related content, promotional messages, and product collections. To customize your homepage:
- Open the theme editor.
- Select Home page from the page selector.
- Review the existing sections in the sidebar.
- Select a section to edit its content and settings.
- Use Add section to insert additional sections supported by the theme.
- Rearrange the sections according to your preferred layout.
- Preview the homepage on desktop and mobile.
- Click Save.
Consider including the following content on your homepage:
- Hero banner: Display an attractive food photograph with a short restaurant introduction.
- Featured menu: Highlight popular dishes or signature food items.
- Food categories: Organize products into sections such as starters, main courses, desserts, and beverages.
- Special offers: Promote seasonal dishes, meal combinations, and limited-time discounts.
- About the restaurant: Introduce your restaurant’s background, food philosophy, and specialties.
- Customer reviews: Display genuine customer feedback using a compatible review section or app.
- Contact information: Make your location, business hours, and contact details easy to find.
Step 5: Create Your Restaurant Menu
Your menu is one of the most important parts of a restaurant website. Customers should be able to understand what you serve, compare available options, and check prices without confusion. Shopify allows you to add food items as products and organize them into collections. Follow these steps:
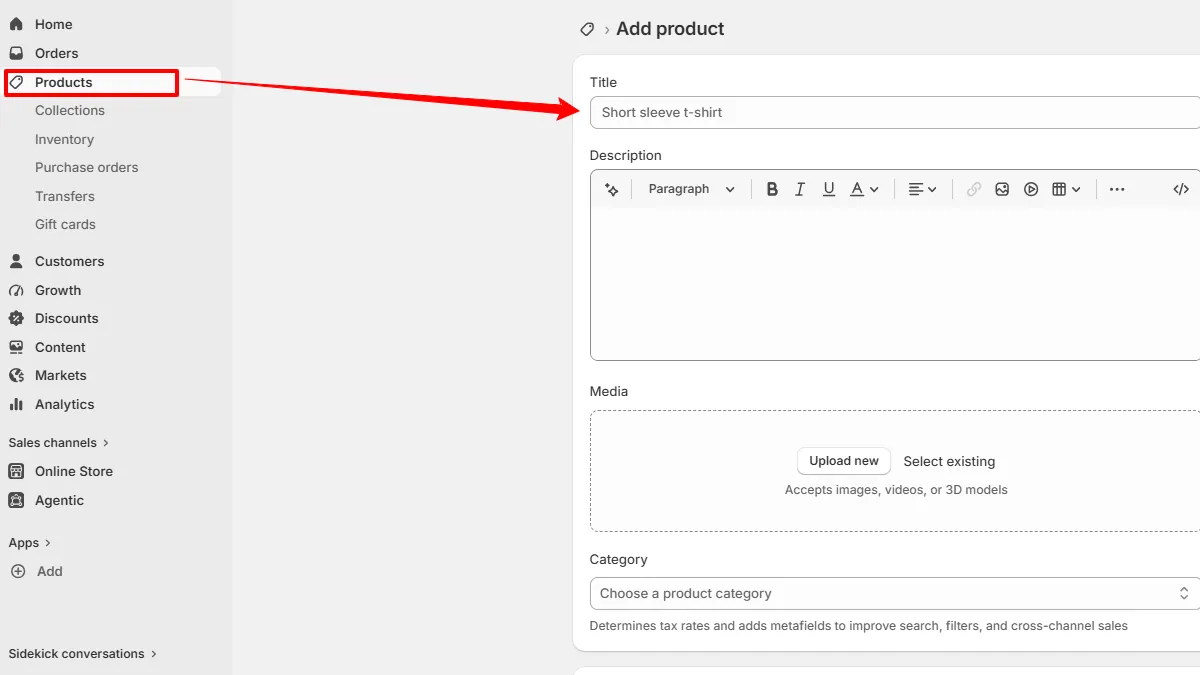
- Open your Shopify admin dashboard.
- Navigate to Products > Add product.
- Enter the food item’s name.
- Write a clear product description.
- Upload high-quality food photographs.
- Enter the selling price.
- Add product variants if the item has different sizes or options.
- Add relevant product details.
- Assign the product to the appropriate collection.
- Click Save.
For example, a restaurant can organize its menu using the following categories:
- Starters
- Main Course
- Pizza and Pasta
- Burgers and Sandwiches
- Desserts
- Beverages
- Special Combos
Write useful descriptions that explain the ingredients, portion sizes, preparation details, and other relevant information. If your dishes contain common allergens, provide accurate allergen information. Do not rely on customers to guess ingredients from photographs or product names.
Step 6: Organize Food Items Into Collections
Once you’ve added your food products, arrange them into collections so customers can browse different menu categories. To create a collection:
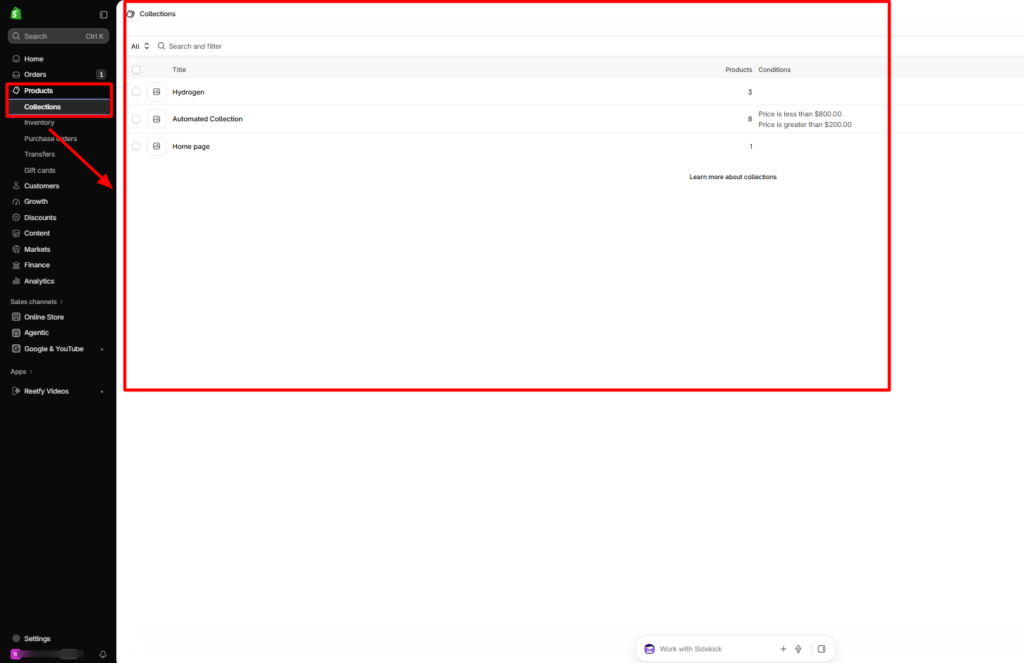
- Go to Products > Collections.
- Click Create collection.
- Enter a suitable collection title, such as Starters or Desserts.
- Add a short description.
- Select the collection type.
- Add the relevant food products.
- Upload a collection image if required.
- Save the collection.
Create separate collections for different food categories instead of displaying every menu item together. This structure makes your restaurant website easier to navigate and helps customers find their preferred dishes.
Step 7: Customize Food Product Pages
Each food item should have a product page containing the information customers need before placing an order. Open the product template in your theme editor and review the available product sections and blocks. Customize the product page using the following elements:
- Food product name
- Product photographs
- Price
- Food description
- Available sizes or variations
- Ingredient information
- Allergen details
- Preparation or serving information
- Add to Cart button
For example, a pizza product page can include the pizza image, available sizes, toppings, ingredients, and price. If customers need to choose extra toppings or special instructions, check whether the theme supports the required options. Otherwise, consider a compatible product-options app. Make sure the product information matches the actual food items available at your restaurant.
Step 8: Add Important Restaurant Website Pages
Besides your homepage and menu, customers may need additional information about your restaurant. Create separate pages for important business details. To create a page:
- Open your Shopify admin.
- Navigate to Online Store > Pages.
- Click Add page.
- Enter the page title.
- Add the required content.
- Review the page visibility settings.
- Click Save.
Consider creating these pages:
About Us: Introduce your restaurant, its background, food philosophy, and the experience you want to provide.
Contact Us: Add your restaurant’s phone number, email address, physical location, and contact information.
Our Menu: Provide an overview of your food categories and link visitors to the relevant menu collections.
Opening Hours: Display your regular operating hours and mention any changes during holidays or special occasions.
Delivery Information: Explain your delivery areas, charges, estimated delivery times, and order-related conditions.
Privacy and Refund Policies: Explain how customer information is handled and outline your applicable refund and cancellation conditions.
Step 9: Configure Online Ordering, Pickup, and Delivery
A Shopify restaurant website should clearly explain how customers can receive their orders. Shopify supports online checkout and local fulfillment options, including pickup and local delivery. However, more advanced restaurant ordering features may require compatible apps.
Set Up Local Pickup
If customers can collect their orders directly from your restaurant, configure Shopify in-store pickup for your eligible location. Follow these steps:
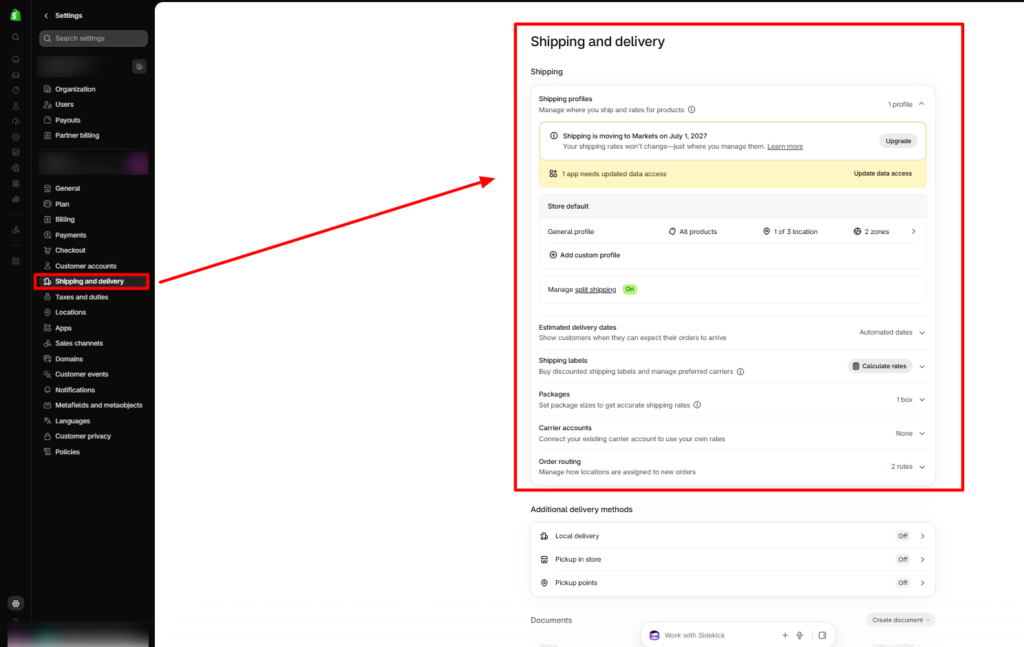
- Open your Shopify admin.
- Navigate to Settings > Shipping and delivery.
- Find the Local pickup section.
- Select the restaurant location where pickup is available.
- Enable the pickup option.
- Review the pickup instructions.
- Save your settings.
Set Up Local Delivery
If your restaurant provides home delivery, configure the available delivery areas. Follow these steps:
- Open Settings > Shipping and delivery.
- Find the Local delivery section.
- Click Set up.
- Select the restaurant location.
- Enable local delivery for that location.
- Configure the delivery area or postal codes.
- Set the applicable delivery charges and minimum order amount.
- Add relevant delivery instructions.
- Click Save.
Review the delivery zones carefully so customers do not place orders outside your service area. For scheduled food orders, delivery time slots, table ordering, or other restaurant-specific workflows, evaluate a compatible Shopify app.
Step 10: Configure Payment Methods
After setting up your menu and ordering options, configure payment methods so customers can complete their purchases. Follow these steps:
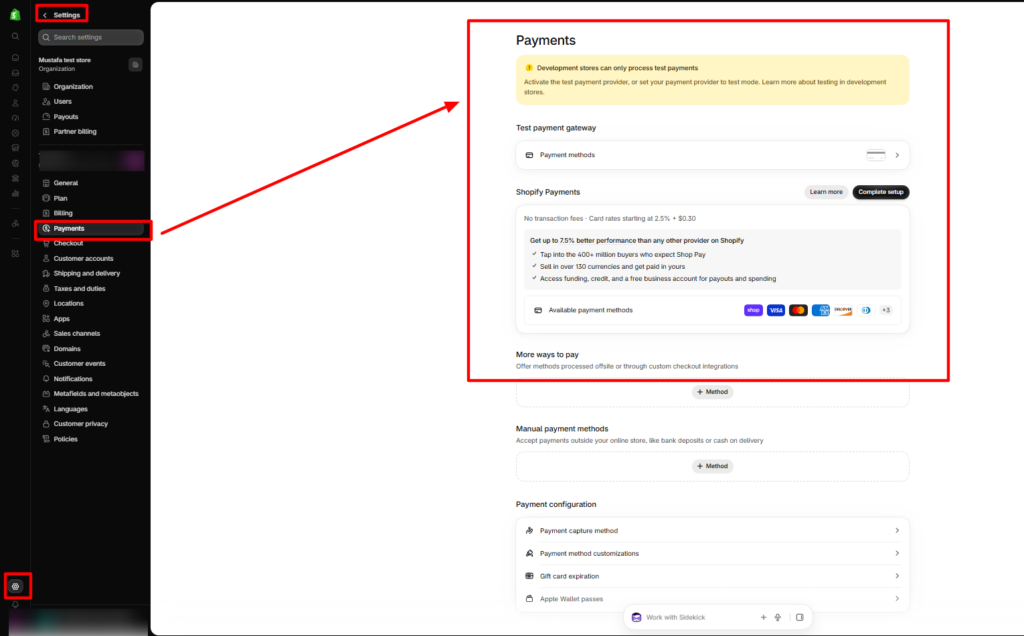
- Open your Shopify admin.
- Navigate to Settings > Payments.
- Review the payment providers available for your store’s country.
- Choose a suitable payment provider.
- Follow the provider’s account setup and verification requirements.
- Configure the available payment methods.
- Save the settings.
- Review the checkout experience.
The available payment gateways depend on your business location and provider eligibility. Review transaction fees, supported payment methods, and settlement conditions before choosing a provider. You can also configure suitable manual payment methods if your restaurant accepts payment at pickup or through another supported arrangement.
Step 11: Customize Website Navigation
A well-organized navigation menu helps customers move between important restaurant pages without unnecessary effort. To configure your navigation:
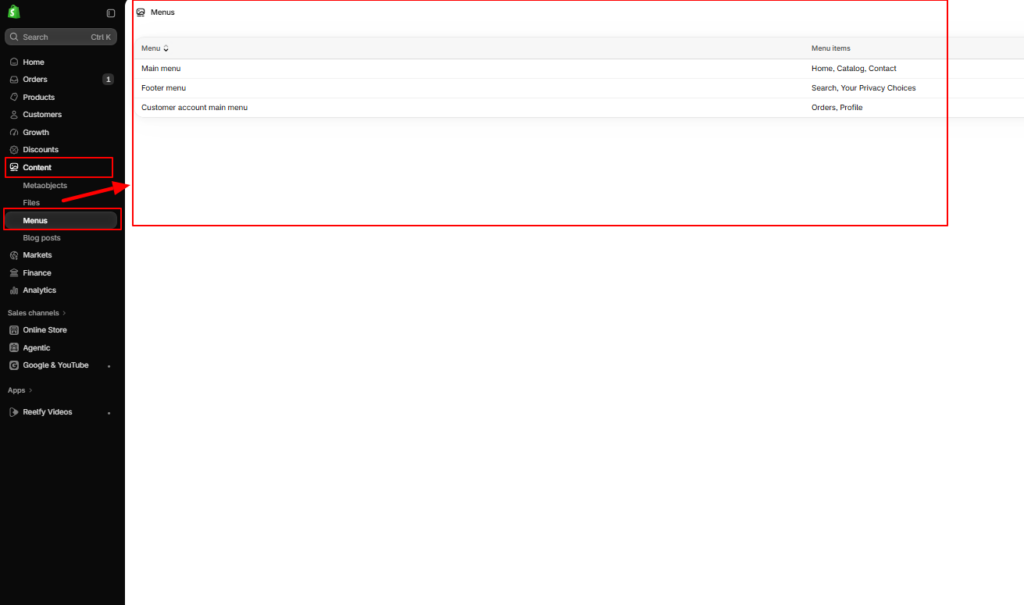
- Open your Shopify admin.
- Navigate to Content > Menus.
- Open your main menu or create a new one.
- Add links to important pages and collections.
- Arrange the links in a logical order.
- Add nested menu items if needed.
- Save the menu.
- Return to the theme editor.
- Select the appropriate menu in the Header settings.
- Preview the navigation on desktop and mobile.
A restaurant website can use a navigation structure like:
- Home
- Our Menu
- About Us
- Special Offers
- Contact Us
Keep the most important destinations easy to access, especially the menu and ordering pages.
Step 12: Add Restaurant Location and Business Hours
Customers often visit a restaurant website to check its location and operating hours. Make this information visible rather than hiding it in lengthy descriptions. Add the following details to your contact page or homepage:
- Restaurant name
- Complete business address
- Phone number
- Email address
- Opening and closing times
- Weekly operating schedule
- Holiday announcements
- Directions or a map link
You can also embed a map using an appropriate supported method or app. Ensure that your website information matches your current business details. Update it whenever your operating hours or location changes.
Step 13: Optimize Your Restaurant Website for Mobile Devices
Many customers browse restaurant menus and search for nearby food options using their smartphones. Your website should therefore remain easy to use on smaller screens. Choosing from well-designed Shopify responsive themes can help you create a storefront that adapts to different screen sizes. Open the theme editor and switch to mobile preview. Check the following elements:
- Logo and header visibility
- Navigation menu usability
- Banner image cropping
- Food product image quality
- Menu text readability
- Product grid spacing
- Add to Cart button visibility
- Checkout usability
- Contact details and footer layout
Use properly sized images and avoid unnecessary sections that make visitors scroll through too much content. Test the actual storefront on different mobile devices before publishing it.
Step 14: Set Up SEO for Your Restaurant Website
Creating a website is only one part of building an online presence. You should also follow effective Shopify SEO practices so search engines can understand your restaurant and its offerings. Here are some important steps:
Optimize Page Titles: Write descriptive titles for your homepage, menu pages, collections, and product pages. Include relevant search terms naturally.
Write Unique Meta Descriptions: Summarize what visitors can expect from each important page. Avoid using the same description across your entire website.
Use Descriptive URLs: Keep page URLs short, meaningful, and easy to understand.
Add Image Alt Text: Describe food photographs and other meaningful images using accurate, relevant language.
Create Local Business Content: Include your restaurant’s actual location, service area, cuisine, and business information where relevant.
Maintain Consistent Business Information: Keep your restaurant’s name, address, phone number, and opening hours consistent across your website and other online business profiles.
Use Internal Links: Connect related menu categories, product pages, and informational pages to help visitors navigate your website. You can also explore relevant SEO tools for Shopify to support your store optimization efforts.
For example, a restaurant in Mumbai can naturally use location-specific phrases in its website content when those terms accurately describe its business.
Step 15: Test and Launch Your Shopify Restaurant Website
Before making your website available to customers, review its design, content, and ordering process. Use this final checklist:
- Check whether the correct Delicious design is active.
- Review the restaurant logo and branding.
- Test homepage banners and navigation links.
- Open every important menu collection.
- Check product descriptions and prices.
- Test product variations and additional options.
- Review pickup and delivery settings.
- Place a test order using the available testing method.
- Check the payment and checkout process.
- Verify restaurant contact information and business hours.
- Review the mobile layout.
- Check page titles, meta descriptions, and image alt text.
- Confirm that policy pages are accessible.
Once everything works as expected, publish your theme and connect your custom domain if you haven’t already done so. Your restaurant website is now ready to introduce your menu and online ordering options to customers.
Final Words
Building a restaurant website is an important step toward creating a stronger online presence for your food business. Shopify provides the tools to display food products, organize menu collections, customize website pages, accept online payments, and manage customer orders. By using the Delicious Food Shopify Theme, you can start with a food-focused storefront design and customize its available settings to reflect your restaurant’s identity. From uploading food photographs and organizing your menu to configuring delivery options and improving SEO, each step contributes to creating a more useful website for your customers.
Focus on presenting accurate menu information, maintaining a consistent design, and making important actions easy to find. With the right setup and regular updates, your Shopify restaurant website can become a valuable channel for connecting with customers and growing your restaurant business.
Frequently Asked Questions
1. Can You Create a Restaurant Website Using Shopify?
Yes. Shopify allows restaurant owners to create websites, display food products, organize menu categories, accept online payments, and manage orders. You can also configure pickup and local delivery options based on your business requirements.
2. Which Shopify Theme Is Suitable for a Restaurant Website?
The Delicious Food Shopify Theme by SAMS IT Services is a food-focused design option. It is a preset of the Nexus Shopify theme and provides a starting point for food-related businesses that want to customize their storefront according to their branding and product requirements.
3. Can Customers Order Food Directly From a Shopify Restaurant Website?
Yes. Customers can purchase food products through your Shopify storefront and complete checkout using the available payment methods. For advanced requirements such as scheduled ordering, delivery time slots, and specialized restaurant workflows, you may need a compatible Shopify app.
4. Can I Add a Digital Menu to My Shopify Restaurant Website?
Yes. You can add menu items as Shopify products and organize them into collections such as Starters, Main Course, Desserts, and Beverages. Add product descriptions, images, prices, and relevant food information to make the menu easier to browse.
5. Can I Offer Pickup and Delivery Through Shopify?
Yes. Shopify supports local pickup and local delivery configurations. You can manage eligible locations, delivery areas, and related settings through your Shopify admin. Additional apps may be needed for more advanced fulfillment requirements.
6. Can I Customize My Restaurant Website Without Coding?
Yes. Shopify’s theme editor allows you to customize supported website sections, colors, typography, images, and content without editing code. Advanced design or functionality changes may require custom development.
7. Is Shopify Suitable for Small Restaurants and Cafes?
Shopify can be suitable for small restaurants, cafes, bakeries, and food businesses that want to sell products online, display their menus, promote their offerings, and manage ecommerce orders. However, businesses requiring complete restaurant POS, kitchen display, or table reservation management should evaluate additional integrations.
8. How Can I Improve the SEO of My Restaurant Website?
You can improve your website’s SEO by writing descriptive page titles and meta descriptions, optimizing food images, creating useful menu content, maintaining accurate business information, and using relevant local search terms. Regularly updating your website also helps keep its information useful for visitors. You can also follow our guide to improving Shopify SEO for additional optimization guidance.